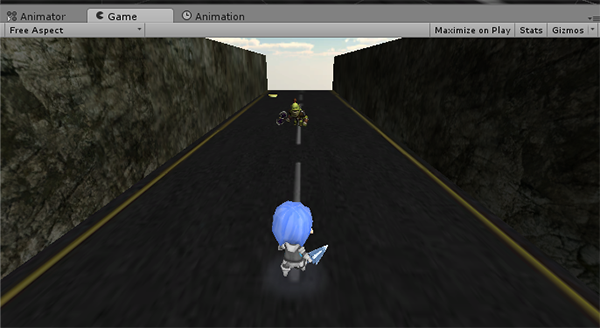
ตัวอย่างการทำ Workshop สร้างเกมด้วย Unity 3D กับเกมแนว Temple Run หลังจากทำฉากเลื่อนตัวละครวิ่งต่อมาจะเป็นการสร้าง Prefab ของ Item และ Enemy ในเกม
จากตัวอย่างตอนที่แล้วในบทความ “Workshop เขียนเกมแนว Temple Run ด้วย Unity 3D ตอนที่ 1”
วีดีโอก่อนหน้านี้คือ ฉากที่เลื่อนเข้าหาตัวละคร และตัวละครก็จะวิ่งไปเรื่อยๆ
ให้เราสร้าง Prefab ขึ้นมาบน Project ของเราครับ คลิกขวาที่ Project Tab เลือก Create -> Prefab
เราจะได้ Prefab มาว่างๆ ตั้งชื่อมันว่า “Items” และสร้างอีกตัวขึ้นมาตั้งชื่อว่า “Monster”
ไปหา 3D Model ของเหรียญทองคำมา 1 ชิ้น และ หา 3D Model ของตัว ก๊อบบลิน มาด้วย (ผมโหลดจาก Asset Store) มาใช้
ทำการเพิ่ม GameObject ขึ้นมาใหม่เป็น Empty Object ตั้งชื่อว่า GameController
แล้วสร้าง Script ภาษา C# ขึ้นมา 1 ไฟล์ตั้งชื่อว่า “DynamicPrefab.cs”
ใส่ Code ดังต่อไปนี้ลงไป ประกาศใต้ class ของ DynamicPrefab
public GameObject monster;
public GameObject items;

float timeElapsed = 0;
float ItemCycle = 0.5f;
bool ItemPowerup = true;
และเพิ่มคำสั่งในฟังก์ชัน Update() ดังนี้
timeElapsed += Time.deltaTime;
		if(timeElapsed > ItemCycle)
		{
			GameObject temp;
			if(ItemPowerup)
			{
				temp = (GameObject)Instantiate(items);
				Vector3 pos = temp.transform.position;
				temp.transform.position = new Vector3(Random.Range(-3, 4), pos.y, pos.z);
			}
			else
			{
				temp = (GameObject)Instantiate(monster);
				Vector3 pos = temp.transform.position;
				temp.transform.position = new Vector3(Random.Range(-3, 4), pos.y, pos.z);
			}

			timeElapsed -= ItemCycle;
			ItemPowerup = !ItemPowerup;
อธิบาย คำสั่งเป็นการใช้ timeElapsed ปั่นให้วัตถุวิ่งเข้าหากล้อง ตามแนว co-ordinate แกน y ที่คงที่ แต่ สุ่มแกน x และ z โดยใช้การ Random.Range สุ่มระยะมาช่วย
ดังนั้นคำสั่งไฟล์ DynamicPrefab.cs จะเป็นดังนี้
using UnityEngine;
using System.Collections;

public class DynamicPrefab : MonoBehaviour {
	public GameObject monster;
	public GameObject items;

	float timeElapsed = 0;
	float ItemCycle = 0.5f;
	bool ItemPowerup = true;

	// Use this for initialization
	void Start () {

	}

	// Update is called once per frame
	void Update () {
		timeElapsed += Time.deltaTime;
		if(timeElapsed > ItemCycle)
		{
			GameObject temp;
			if(ItemPowerup)
			{
				temp = (GameObject)Instantiate(items);
				Vector3 pos = temp.transform.position;
				temp.transform.position = new Vector3(Random.Range(-3, 4), pos.y, pos.z);
			}
			else
			{
				temp = (GameObject)Instantiate(monster);
				Vector3 pos = temp.transform.position;
				temp.transform.position = new Vector3(Random.Range(-3, 4), pos.y, pos.z);
			}

			timeElapsed -= ItemCycle;
			ItemPowerup = !ItemPowerup;
		}
	}
}
ออกมา Insterctor ตัว Gamecontroller ตั้งค่าตามนี้
สร้าง C# ไฟล์ขึ้นมาใหม่เป็น Items.cs และ Monster.cs
กำหนดค่า Interval ของ ทั้งสองตัวที่ 0.5 และใช้หลักการเดียวกับฉากเลื่อน
ไฟล์ Items.cs
using UnityEngine;
using System.Collections;

public class Items : MonoBehaviour {
	public float objectSpeed = -0.5f;
	// Use this for initialization
	void Start () {

	}

	// Update is called once per frame
	void Update () {
		transform.Translate(0, 0, objectSpeed);
	}
}
ไฟล์ Monster.cs
using UnityEngine;
using System.Collections;

public class Monsters : MonoBehaviour {
	public float objectSpeed = -0.5f;
	// Use this for initialization
	void Start () {

	}

	// Update is called once per frame
	void Update () {
		transform.Translate(0, 0, objectSpeed);
	}
}
ไปที่ Prefab ของ Item กำหนด Position ดังนี้
ของ Monster ก็ตั้งค่าตามนี้
สรุปสว่นของ Position ส่วนของ Inspect ทั้ง Prefab ของ Items และ Monster


ตั้งค่า Box Collider โดยการคลิกที่ Add Component เลือก Physics – > Box Collider ตั้งค่ากล่องให้ครอบ และไม่เกินล้นตัว Monster และ Items จนเกินไป
อย่าลืมใส่ script Items.cs ที่ Prefab Items และ ใส่ script Monster.cs ที่ Prefab Monster ทดสอบเกมของเราแล้วดูว่า มันสุ่มตำแหน่งของ Item และ monster ถูกหรือเปล่า
จะเห็นว่ามีตัวศัตรู เลื่อนลงมา พร้อมกับเหรียญในตำแหน่งที่ถูกสุ่มไปเรื่อยๆ บทเรียนนี้ก็เป็นอันเรียบร้อย สิ่งที่น่าจะได้จากบทเรียนนี้คือการใช้ Dynamic Prefab ทำการ Clone ตัว GameObject ของเราออกมาใหม่ให้ปรากฏในเกม
วีดีโอผลลัพธ์ของบทเรียนนี้


