
ตัวอย่างต่อไปนี้เป็นบทเรียนการพัฒนาเกม 2 มิติบน Unity รูปแบบง่าย ด้วยภาษา C# และการใช้ฟังก์ชันการควบคุมตัวละคร ประกอบการทำงานแบบ OOP
ลักษณะของเกมในการออกแบบคือ ตัวละคร จะวิ่งไปมาในฉาก โดยมีเวลาที่จำกัด ในขณะที่เกมดำเนินไป วัตถุที่หล่นจากท้องฟ้าจะมีอยู่ 2 ประเภทคือ ลูกไฟ ที่ตัวละครโดนก็จะตายทันที และ เหรียญที่เมื่อเก็บได้ก็จะเป็นการเพิ่มคะแนนให้ตัวละคร การควบคุมตัวละครคือการเดินไปทางซ้ายและขวาของฉาก โดยมีการอัตราความเร่ง ขณะออกตัวไปจนความเร็วคงที่ตามหลักของฟิสิกส์
ถ้ามองเห็นภาพคร่าวๆ แล้วก็มาลองพัฒนากันดูครับ
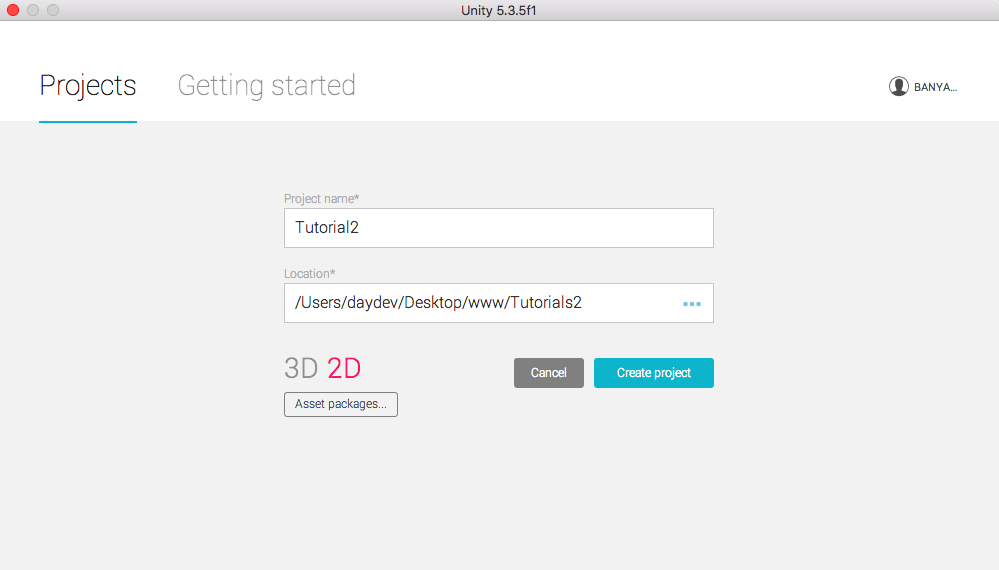
เริ่มต้นให้สร้าง New Project บน Unity ขึ้นมาเลือกรูปแบบของเกมเป็น 2D
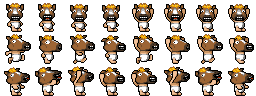
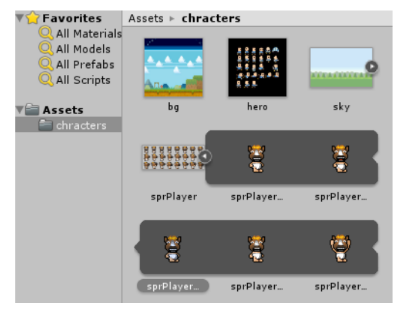
เมื่อสร้างเสร้จแล้วเราจะใช้ Sprite (ภาพประกอบ)สำหรับสร้างวัตถุต่างๆ ในเกมด้วยภาพต่อไปนี้ ฉากหลัง (ไปหามา) ตัวละคร (ผมไปยืทมนุษย์ม้าจากเกม HORSE! – Global Game Jam) มาเป็นตัวละครหลักเพราะชอบมันกวนดี
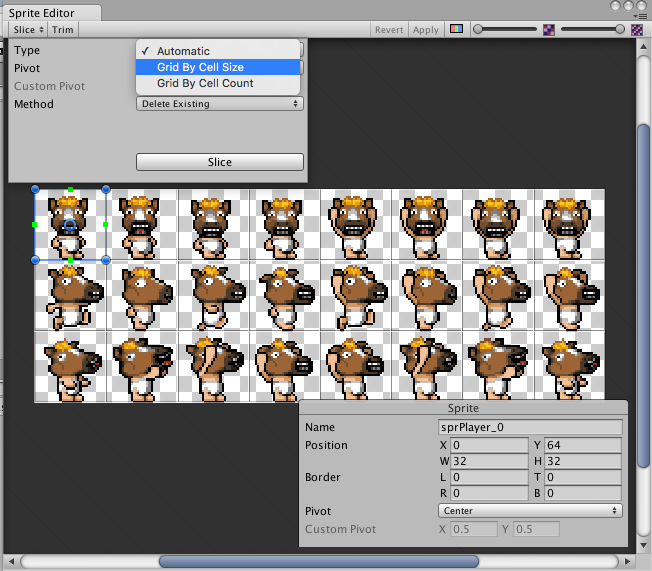
ทำการ Import ไฟล์ทั้งหมดลงไปใน Project ของเราแล้วใช้ บทเรียนก่อนหน้านี้ (Unity2D การนำ Sprite Sheets ไปสร้าง Animation ในเกม) หลังจากนั้นให้ทำการตัดตัวละครของเราโดยการ Slice เลือก Sprite2D, Multiple แล้วกดปุ่ม Sprite Editor บน Inspector
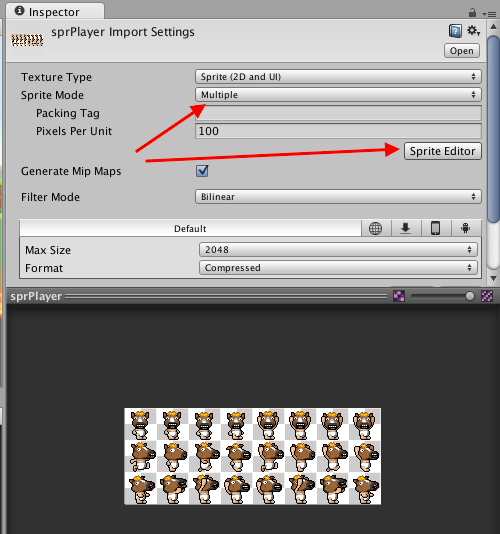
ทำการ Slice ด้วยรูปแบบ Grid by Cell Size เลือกขนาด 32 x 32 pixels เมื่อมีการตีกรอบโอเคแล้วกด Apply
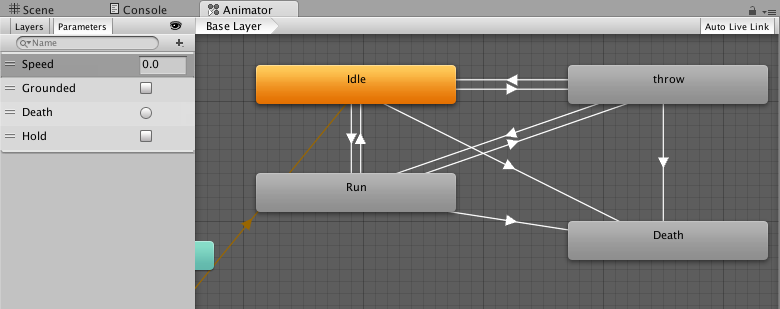
สร้าง Animation และ Animator Controller ขึ้นมาจาก Sprite ที่ถูกตัดเป็นชุดแล้ว ออกเป็น 3 ท่าทางคือ Idle, Run และ Death
ใช้บทเรียนจากอันเก่ามาประยุกต์ ส่วนการกำหนด Animator Controller นั้นให้สร้างใหม่ขึ้นมา 1 ตัวตั้งชื่อว่า “Player”
กดเข้าไปสร้าง State Animation ของตัว animator Controller ตามนี้ครับ ไปที่ Parameters ทำการสร้าง Parameters ต่อไปนี้
- Speed เป็น Float
- Grounded เป็น Bool
- Death เป็น Trigger
- Hold เป็น Bool
ในการลาก Transition นั้นให้ไปศึกษาจากตัวอย่าง 3D ในบทความก่อนๆ เอานะครับ (รวมบทความเขียนเกมด้วย Unity)
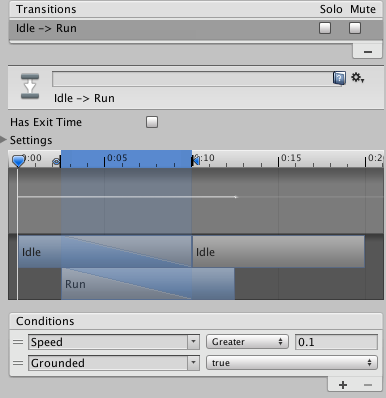
การตั้งค่าจาก Idle ไป Run ให้ใช้ การตั้งค่าตามนี้ครับ
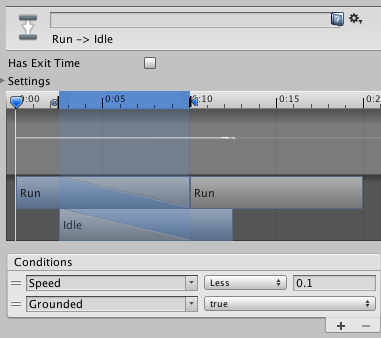
ส่วนการตั้งค่าจาก Run ไป Idle
ทั้ง Idle และ Run ไปยังการตายคือ Death ใช้ Trigger ทางเดียวไม่มีปัญหา
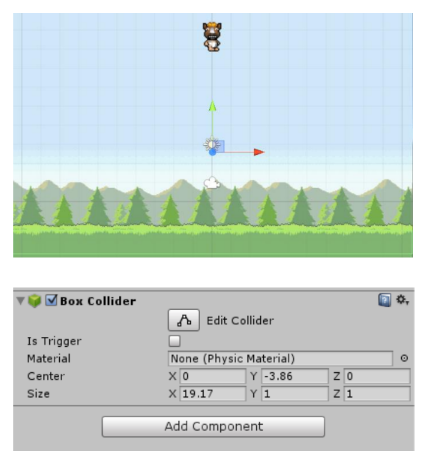
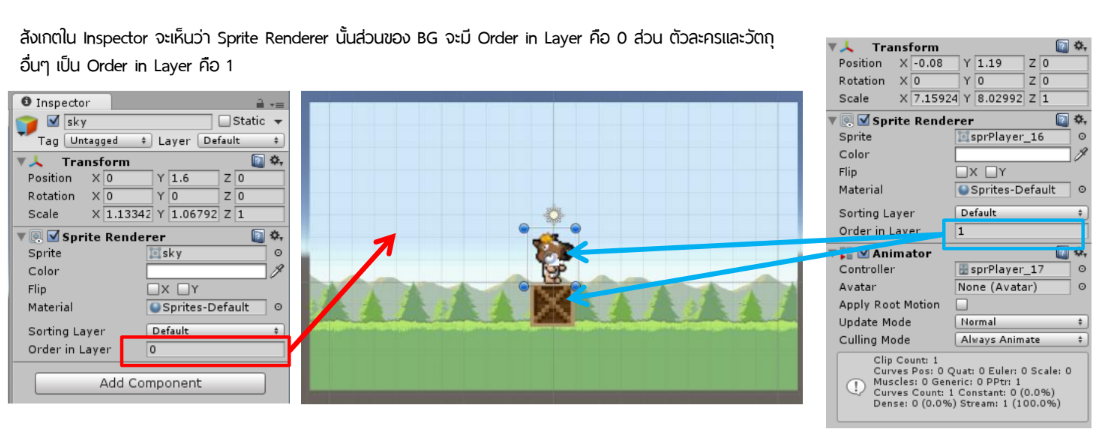
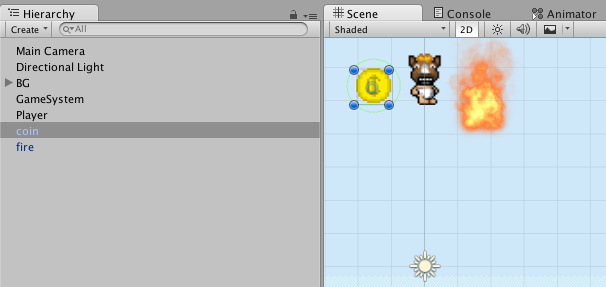
สร้างฉากหลัง Backgrounds ของเกม นำภาพ Background ไปวางใน Hierarchy ให้เรียบร้อย แล้วนำตัวละครไปวางเป็น Layer ที่ 1 ปรับส่วน Sprite Renderer ให้ Background เป็น Layer 0 และตัวละครเป็น Layer 1 สำหรับ Background ให้เพิ่ม Box Collider สร้างไว้แล้วปรับตำแหน่งให้เป็น พื้นสำหรับตัวละครเหยียบ ปรับที่ส่วนของ Size และ Center
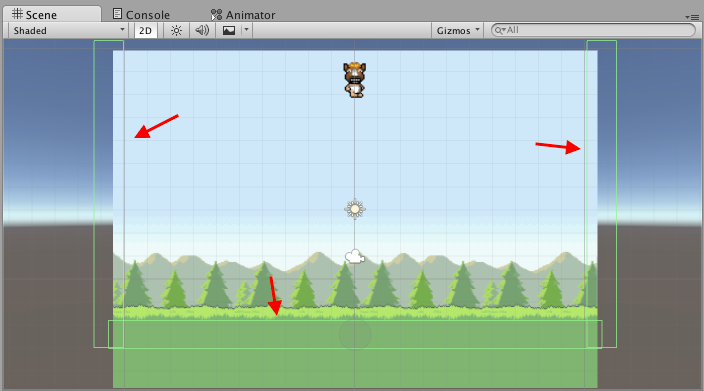
เพื่อกันตัวละครตกฉากดังนั้นต้องกันด้านซ้าย และ ขวาด้วย
สำหรับการปรับ Layer ว่าอะไรอยู่หน้าอยู่หลัง Layer 0 คือหลังสุด 1 คืออยู่ลำดับถัดมา ถ้ามีมากกว่านั้น 2 ไปถึง 100 ก็แล้วแต่จำนวน Layer วิธีการเรียงนั้นให้กดที่ Background และ Player ปรับการตั้งค่าที่ Order in Layer ใน Sprite Renderer ให้เรียบร้อยตามตัวอย่าง
ไปที่ตัวละครทำการเพิ่ม Add component ส่วนของ RigidBody2D สำหรับระบบฟิสิกส์ Circle Collider2D สำหรับเคลื่อนที่ และ Box Collider2D สำหรับชน ตั้งค่า Circle Collider2D และ Box Collider2D ตามตัวอย่างที่กำหนดครับ
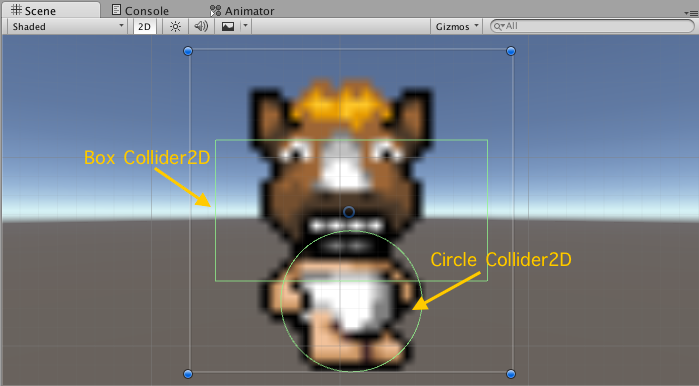
เฉพาะ Box Collider2D จะมีการเลือก Is Trigger ไว้สำหรับชน ส่วน Circle Collider2D ไม่ต้อง เพราะจะทำหน้าที่เป็นเหมือนล้อรถเคลื่อนไปมาซ้ายขวา
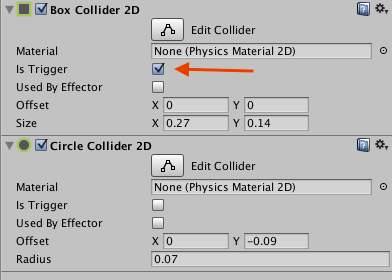
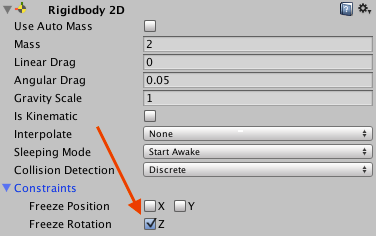
ถ้า Circle Collider2D เลื่อนตัวไปมาตัวละครเราจะหมุนตามไปด้วยดังนั้นต้องไป Freez มุมของแกน Z ไม่ให้ตัวละครหมุนไปมาเวลาเดิน ให้ไปที่ RigidBody2D Component แล้วเปิด Constraints ทำการ Freeze Rotation ที่แกน Z เป็นหลัก
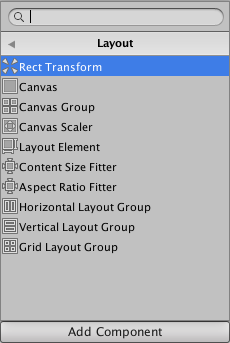
เพิ่ม Add component ใหม่เข้าไปคือ Layout -> Rect Transform
สร้าง Player.cs ไฟล์ C# ขึ้นมาเขียนคำสั่งต่อไปนี้ ให้ประกาศตัวแปร Public และ Private เป็นส่วนในการควบคุม
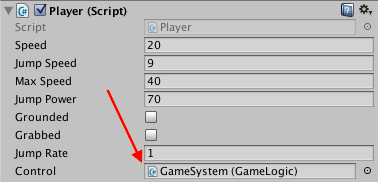
public float speed = 20f;
public float jumpSpeed = 9f;
public float maxSpeed = 40f;
public float jumpPower = 70f;
public bool grounded;
public bool grabbed;
public float jumpRate = 1f;
private float nextPress = 0.0f;
private Rigidbody2D rigidbody2d;
private Physics2D physics2d;
private Animator anim;
public GameLogic control;
เป็นการกำหนดความเร็วในการออกตัว และความเร่งเมื่อมีการวิ่งต่อเนื่องที่
public float speed = 20f;
public float maxSpeed = 40f;
ควบคุมการกระโดดต่อเนื่อง โดยการกดกระโดดจะเกิดขึ้นได้เมื่อมีการตกถึงพื้นก่อน
public bool grounded;
public float jumpRate = 1f;
private float nextPress = 0.0f;
ประกาศตัวแปรสำหรับรับค่า Component ของ Rigidbody2D, Physics2D, Animator controller และ ระบบควบคุมเกมที่เราจะสร้างไฟล์ GameLogic.cs มาภายหลังเก็บไว้ในตัวแปร control
private Rigidbody2D rigidbody2d;
private Physics2D physics2d;
private Animator anim;
public GameLogic control;
เมื่อมีการกำหนดตัวแปร RigidBody2D ไว้ที่ตัวแปร rigidvody2d แล้วให้ประกาศการเรียก Component ไว้ในเมธอด start(); โดยทำทั้ง Animator Controller กับตัวแปร anim
void Start () {
        rigidbody2d = gameObject.GetComponent<Rigidbody2D>();
        anim = gameObject.GetComponent<Animator>();
    }
เขียนคำสั่ง ในการเรียกปุ่มกด ซ้ายขวา (ปุ่มลูกศร และ A,D) ผ่านคำสั่ง Input.GetAxis ส่วน Horizontal
void Update () {
        anim.SetBool("Grounded",true);
        anim.SetFloat("Speed",Mathf.Abs(Input.GetAxis("Horizontal")));
        if(Input.GetAxis("Horizontal") < -0.1f){
            transform.localScale = new Vector3(-7,7,7);
        }else{
            transform.localScale = new Vector3(7,7,7);
        }
        if(Input.GetButtonDown("Jump")&& Time.time > nextPress){
            nextPress = Time.time + jumpRate;
            rigidbody2d.AddForce((Vector2.up * jumpPower)*jumpSpeed);
        }
    }
ถ้าแกน X ของภาพไปทางซ้ายค่าจะน้อยกว่า -0.1f จะเคลื่อนภาพไปทางซ้าย และ ถ้ามากกว่าก็จะเคลื่อนไปทางขวา
if(Input.GetAxis("Horizontal") < -0.1f){
            transform.localScale = new Vector3(-7,7,7);
        }else{
            transform.localScale = new Vector3(7,7,7);
        }
กดปุ่มกระโดดจะไปมีการกระโดด และหน่วงค่า
if(Input.GetButtonDown("Jump")&& Time.time > nextPress){
            nextPress = Time.time + jumpRate;
            rigidbody2d.AddForce((Vector2.up * jumpPower)*jumpSpeed);
        }
ผ่าน nextPress คือการกดครั้งต่อไปจะ Active คือเอาเวลา มา + กับอัตราความหน่วงเวลาความถี่ในการกระโดด
nextPress = Time.time + jumpRate;
เพิ่ม เมธอด Fixedpdate() ขึ้นมาเพื่อให้มีการพลิกไปมา
void FixedUpdate () {
        float h = Input.GetAxis("Horizontal");
        rigidbody2d.AddForce((Vector2.right * speed)*h);
        if(rigidbody2d.velocity.x > maxSpeed){
            rigidbody2d.velocity = new Vector2(maxSpeed, rigidbody2d.velocity.y);
        }
        if(rigidbody2d.velocity.x < -maxSpeed){
            rigidbody2d.velocity = new Vector2(-maxSpeed, rigidbody2d.velocity.y);
        }
    }
จากตัวอย่างแนวคิดของเกมของเรา เราจะให้วัตถุที่หล่นลงมามีเหรียญ (coin) และลูกไฟ (fire) เราต้องจินตาการว่าวัตถุเหล่านั้นจะเป็น GameObject ที่ถูกโคลนเป็น Prefabs เรียบร้อยดังนั้นให้เราเพิ่มเงื่อนไขการชนวัตถุ coin(Clone) และ fire(Clone) เข้าไป โดย GameLogic.cs ที่เป็นระบบเกมอยู่ในตัวแปร control จะต้องมีฟังก์ชันว่า gameOver หรือยัง ดังนั้นเพิ่มเมธอด OnTiggerEnter2D(); เข้าไปดังนี้ใน Player.cs
void OnTriggerEnter2D(Collider2D other)
    {
        if(other.gameObject.name == "coin(Clone)")
        {
            Debug.Log("coin");
            control.GetItems();
            Destroy(other.gameObject);
        }
        else if(other.gameObject.name == "fire(Clone)")
        {
            Debug.Log("fire");
            control.CrashFire();
            RectTransform rectTransform = GetComponent<RectTransform>();
            rectTransform.Rotate( new Vector3( 0, 0, 90 ) );
            anim.SetTrigger("Death");
                        StartCoroutine(WaitDeath());
        }
}

IEnumerator WaitDeath() {
   yield return new WaitForSeconds(1);
   control.isGameOver = true;
}
โดยเมื่อชนไฟจะหน่วงเวลาก่อน GameOver 1 วินาทีเรียก
StartCoroutine(WaitDeath());
แล้วไปทำงานที่ WaitDeath();
IEnumerator WaitDeath() {
   yield return new WaitForSeconds(1);
   control.isGameOver = true;
}
ให้เราสร้าง sprite ของ coin และ fire ขึ้นไปมั่นในว่าชื่อใน Inspector ถูกต้องแล้ว
ตั้งค่า Circle collider2D และ Rigidbody2D ให้ coin ดังนี้
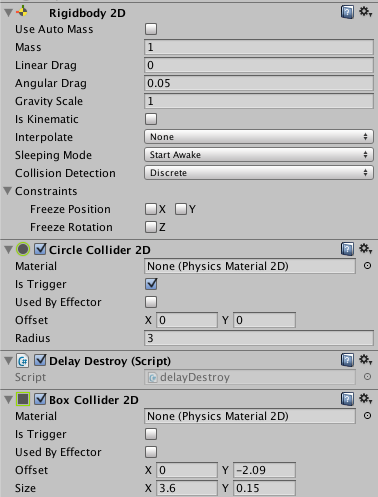
แทรกไฟล์ DelayDestroy.cs เข้า โดยมี code คำสั่งให้ทำลายตัวเองใน 3 วินาที
using UnityEngine;
using System.Collections;

public class delayDestroy : MonoBehaviour {
    float SecondsUntilDestroy = 3f;
    float startTime;
    // Use this for initialization
    void Start () {
        startTime = Time.time;
    }

    // Update is called once per frame
    void Update () {
        if (Time.time - startTime >= SecondsUntilDestroy) {
            Destroy(this.gameObject);
        }
    }
}
เช่นกันลูกไฟ (fire) ให้ กำหนด Box Collider2D, Circle Collider2D และ RidgidBody2D ตามภาพ
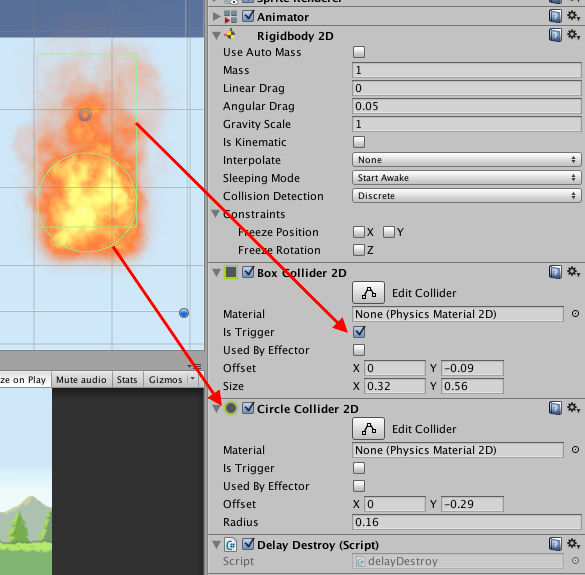
ใช้ไฟล์ DelayDestroy.cs เช่นกัน
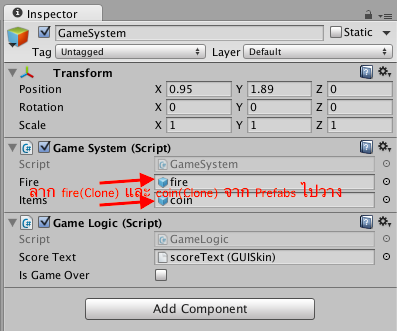
ทำการ Clone ทั้ง coin, fire และ player ลงใน Folder Prefabs ใน Project ถ้าไม่มีก็สร้างขึ้นมา (คนถามเยอะมาก) วิธีการ clone คือลากจาก Hierarchy มาวางเลยครับเมื่อมั่นใจว่าครบแล้วลบต้นแบบจาก Hierarchy เลย

กลับไปที่ Hierarchy ให้สร้าง Create Empty ขึ้นมาใส่ C# ลงไปว่า GameLogic.cs ซึ่งจะเป็น code เก่าๆ ที่เคยเขียนไว้ใน tutorial แรกๆ ของเกม 3D ซึ่งใช้ด้วยกันได้ครับ (ไปอ่านกันก่อนนะ) ซึ่ง GameLogic.cs คือไฟล์ในการควบคุมว่าเวลาหมดหรือยัง GameOver หรือยัง และควบคุมไปถึงพวก UI หลังจากนั้นให้เราสร้างไฟล์ GameSystem.cs ขึ้นมาเป็นการควบคุมการปล่อยวัตถุหล่นจากฟ้าทั่วฉากสุ่มไป
ไฟล์ GameLogic.cs
using UnityEngine;
using System.Collections;

public class GameLogic : MonoBehaviour {
    float timeRemaining = 1000f;
    float timeExtension = 3f;
    float timeDeduction = 2f;
    float totalTimeElapsed = 0;
    float score=0f;
    public GUISkin scoreText;
    public bool isGameOver = false;

    void Start () {
        Time.timeScale = 1;
    }


    void Update () {
        if(isGameOver)
            return;      //move out of the function

        totalTimeElapsed += Time.deltaTime;

        timeRemaining -= Time.deltaTime;
        if(timeRemaining <= 0){
            isGameOver = true;
        }
    }

    public void GetItems()
    {
        timeRemaining += timeExtension;
        score = score+1;
    }

    public void CrashFire()
    {
        timeRemaining -= timeDeduction;
    }

    void OnGUI()
    {
        GUI.skin=scoreText;
        if(!isGameOver)
        {
            GUI.Label(new Rect(10, 10, Screen.width/5,
                Screen.height/6),
                "เวลา: "+((int)timeRemaining).ToString());
            GUI.Label(new Rect(Screen.width-(Screen.width/6), 10,
                Screen.width/6, Screen.height/6),
                "คะแนน: "+((int)score).ToString());
        }

        else
        {
            Time.timeScale = 0;

            //Show Total Score
            GUI.Box(new Rect(Screen.width/4,
                Screen.height/4,
                Screen.width/2,
                Screen.height/2),
                "GAME OVER\nYOUR SCORE: "+(int)score);

            //Restart Game
            if (GUI.Button(new Rect(Screen.width/4+10,
                Screen.height/4+Screen.height/10+10,
                Screen.width/2-20, Screen.height/10),
                "RESTART")){
                Application.LoadLevel(Application.loadedLevel);
            }

        }
    }

}
ระบบจะถามหา GUISkin ให้ไปศึกษาบทความเก่า (https://www.daydev.com/2014/unity-temple-run-tutorial-4.html)
*หมายเหตุ: ถ้าไม่อ่าน ไม่เรียนมาก่อนแล้วมาถามผมจะไม่ตอบนะครับ และเบื่อเหตุผลว่ามือใหม่มาก
ไฟล์ GameSystem.cs
using UnityEngine;
using System.Collections;
public class GameSystem : MonoBehaviour {
    public GameObject fire;
    public GameObject items;
    float timeElapsed = 0;
    float ItemCycle = 3f;
    bool ItemPowerup = true;
    void Update () {
        timeElapsed += Time.deltaTime;
        if(timeElapsed > ItemCycle)
        {
            GameObject temp;
            if(ItemPowerup)
            {
                temp = (GameObject)Instantiate(items);
                Vector3 pos = temp.transform.position;
                temp.transform.position = new Vector3(Random.Range(-5, 5), pos.y, pos.z);
            }
            else
            {
                temp = (GameObject)Instantiate(fire);
                Vector3 pos = temp.transform.position;
                temp.transform.position = new Vector3(Random.Range(-5, 5), pos.y, pos.z);
            }
            timeElapsed -= ItemCycle;
            ItemPowerup = !ItemPowerup;
        }
    }
}
ไปที่ Player ใน Hierarchy ลาก GameObject ที่มี GameLogic อยู่ไปวางใน Player ได้เลย
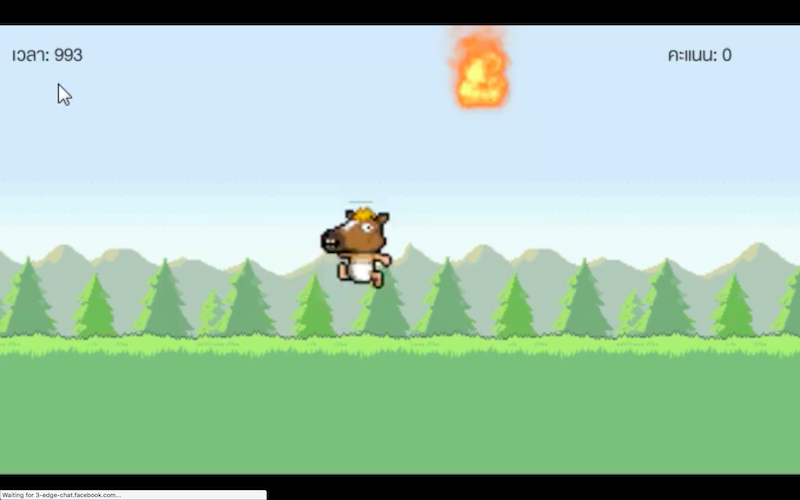
เกมของเราก็จะทำงานได้เรียบร้อยเลย ทดสอบการเล่น
บทเรียนต่อไป จะเป็นการทำ 2D side Scrolling เกมแนวผจญภัยครับ ติดตามกัน


One Comment