พอมีเวลาไปหา jQuery Plugin ดีๆ มาใช้กับงานของตัวเอง ในอินเทอร์เน็ตแล้วไปเจอกับ เจ้า Plugin ที่ชื่อว่า “Baraja” เข้าดูแล้วน่ารักดีเลยเอาแนะนำให้เอาไปใช้ทำแกลอรี่กันครับที่มาของเจ้า jQuery Plugin ตัวนี้นั้นสามารถเข้าไปดาวน์โหลดหรือศึกษาได้ที่ https://github.com/codrops/Baraja เลยซึ่งทีมพัฒนานั้นให้เราเอาไปใช้ได้ฟรี ไม่ต้องเสียค่าใช้จ่ายใดๆ แต่ต้องอยู่ใน License ของ MIT License นะครับ
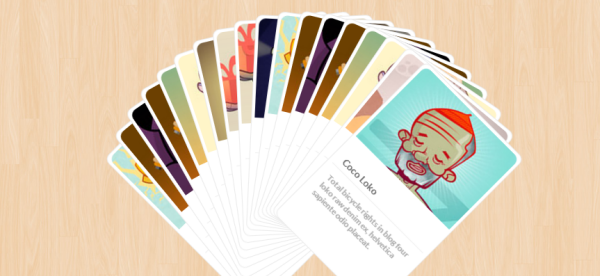
รูปแบบการแสดงผลนั้นเป็นแบบน่ารักที่จับภาพของเรา และคำอธิบายใต้ภาพแสดงผลออกมาเป็นการ์ด น่าสนใจ พาลนึกได้ว่าถ้าเอามาพัฒนาร่วมกับ Instagram API น่าจะได้เว็บแกลอรี่สวยๆ แบบการ์ดโพลาลอยด์ ขยับไปมาน่าสนใจไม่น้อย
สำหรับการใช้งานนั้น ให้ไปดาวน์โหลดที่
ครับ เราจะได้ไฟล์มาดังนี้

ซึ่งคำสั่งในการ Tansform หรือขยับแอนิเมชันนั้นใช้ CSS เป็นหลัก ดังนั้นต้องดูที่ Browser ด้วยครับว่า Browser ไหนลองรับด้วย (แน่นอนว่า IE อาจจะต้องลุ้นเล็กน้อย)
วิธีใช้งาน Plugin ครับ เจ้า Baraja จะมี Class ให้เรียกใช้อยู่แล้วชื่อว่า “baraja-container” วิธีเรียกใช้ก็แค่แทรกใน HTML ไปเลยตามตัวอย่าง
ซึ่ง Class น้ั้นจะถูกเรียกผ่าน Plugin ดังนี้
$( '#baraja-el' ).baraja();
เป็นคำสั่งในการ Trigger ให้ Div ดังกล่าวทำงาน อัตโนมัติผ่าน Option ที่เป็นตัวแปรที่ Baraja แนบมาให้
$( '#some-button' ).on( 'click', function( event ) {

    baraja.fan( {
        speed : 500,
        easing : 'ease-out',
        range : 90,
        direction : 'right',
        origin : { x : 25, y : 100 },
        center : true,
        translation : 0
    } );

} );
ตัวอย่างที่ผมได้ลอง ดาวน์โหลดมาเล่นดู จะเป็นตามนี้ครับ
ซึ่ง Option อื่นๆที่ Baraja นั้นมีให้เลือกการแสดงผล ก็มีให้เลือกเพิ่มเติมคือ
// the options
$.Baraja.defaults = {
    // if we want to specify a selector that triggers the next() function.
    //example: '#baraja-nav-next'
    nextEl : '',
    // if we want to specify a selector that triggers the previous() function
    prevEl : '',
    // default transition speed
    speed : 300,
    // default transition easing
    easing : 'ease-in-out'
};
โดยตัวแปรในการ control นั้นก็ประกอบไปด้วย
fan(), next(), previous(), close(), add()
ซึ่งค่าตั้งต้น แต่แรกที่ใช้งานนั้นจะเป็นแบบนี้มาก่อน
this.fanSettings = {
    // speed for opening/closing
    speed : 500,
    // easing for opening/closing
    easing : 'ease-out',
    // difference/range of possible angles that the items will have
    // example: with range:90 and center:false the first item
    // will have 0deg and the last one 90deg;
    // if center:true, then the first one will have 45deg
    // and the last one -45deg; in both cases the difference is 90deg
    range : 90,
    // this defines the position of the first item
    // (to the right, to the left)
    // and its angle (clockwise / counterclockwise)
    direction : 'right',
    // transform origin:
    // you can also pass a minX and maxX, meaning the left value
    // will vary between minX and maxX
    origin : { x : 25, y : 100 },
    // additional translation of each item
    translation : 0,
    // if the cards should be centered after the transform
    // is applied
    center : true,
    // add a random factor to the final transform
    scatter : false
};
เราสามารถปรับแต่งได้จาก Option ข้างต้นที่ว่าไว้ครับ
แนะนำว่าคนทำเว็บคนไหนที่ต้องการหน้าแสดงผล ภาพถ่ายสวยๆ ในรูปแบบการ์ดน่ารักๆ ก็ลองดาวน์โหลดไปใช้กันดูครับ


