
พัฒนาแอพพลิเคชันบนแพลตฟอร์ม iOS หรือ iPhone กับบทเรียนแนะนำวิธีการตกแต่ง UITableViewCell บน UITableView ให้ออกมาสวยงาม และน่าใช้งานแน่นอนว่าถ้าเราใช้งาน UITableView ง่ายๆ แสดงผลตารางเป็นแถวของข้อมูลจาก Array แบบที่หน้าจอบทเรียนก่อนหน้านี้ คือ “iOS Developer ตอนที่ 5 ปรับแต่งรูปภาพ Thumbnail บน UITableViewCell” ได้แสดงผลออกมานั้นยังไม่ตอบโจทย์ เพราะว่ามันดูเหมือยแอพพลิเคชันธรรมดาๆ ทั่วๆ ไป

แม้ว่าจะพยายามปรับรูปแบบของ UITableViewCell ให้เป็นแบบ Custom หรือเป็นแบบ Subtitle ผ่านหน้า StoryBoard ไปบ้างแล้วก็ยังรู้สึกธรรมดาอยู่ดี ปรับอะไรหวือหวาไม่ได้ ผมก็เลยหาวิธีการปรับแต่งหน้าจอ Interface ของ UITableViewCell ให้น่าสนใจขึ้นครับ แน่นอนว่าอาจจะต้องใช้งานไฟล์ Source Code หรือศึกษาบทเรียนก่อนหน้านี้มาก่อนในการใช้งาน UITableView ครับ
- iOS Developer ตอนที่ 5 ปรับแต่งรูปภาพ Thumbnail บน UITableViewCell
- iOS Developer ตอนที่ 4 การเรียกใช้งาน UITableView
ผมจะอ้างอิง Project เดิมจาก 2 บทข้างต้นครับ
สำหรับการปรับแต่ง UITableViewCell นั้น หลายคนที่ต้องปรับแต่งแถวของข้อมูลให้ดูแปลกตา หรือน่าสนใจ ก็เพราะว่ามีเหตุผลในการรองรับการใช้งาน โดยเฉพาะพวกแอพพลิเคชันอย่าง E-Book หรือ E-Magazine ที่ต้องมีการแสดงหน้าปก ชื่อหนังสือ และ ราคา พร้อมคำโปรยเป็นต้นครับ และเพราะว่าข้อมูลทั้งหมดนั้นมันอัดใน Cell เดียวไม่ได้แน่นอนครับ จึงต้องมีการปรับแต่ง UITableViewCell ขึ้นมาครับ
เปิดไฟล์ ViewController.h ขึ้นมา แก้ไขไฟล์นี้ใหม่โดยเปลี่ยนและเพิ่มตัวแปรลงไปจาก
#import "UIKit/UIKit.h";
@interface ViewController : UIViewController
@end
ให้กลายเป็น
@interface ViewController : UIViewController
{
    NSArray *titleMagazine;
    NSArray *coverMagzine;
    NSArray *priceMagazine;
    NSArray *detailMagazine;
}
@property (nonatomic, retain) NSArray *titleMagazine;
@property (nonatomic, retain) NSArray *coverMagzine;
@property (nonatomic, retain) NSArray *priceMagazine;
@property (nonatomic, retain) NSArray *detailMagazine;
ต่อมาให้ทำการแก้ไขไฟล์ Viewcontroller.m ในตำแหน่งของการสร้างตัวแปร Array ใหม่อีกครั้ง จาก
#import "ViewController.h"
@implementation ViewController
{
    NSArray *tableData;
}
#pragma mark - View lifecycle
- (void)viewDidLoad
{
    [super viewDidLoad];
    tableData = [NSArray arrayWithObjects:@"daydev",@"gooruism",@"solomohub" , nil];
}
ให้กลายเป็น
@implementation ViewController
@synthesize coverMagzine;
@synthesize titleMagazine;
@synthesize priceMagazine;
@synthesize detailMagazine;

#pragma mark - View lifecycle

- (void)viewDidLoad
{
    titleMagazine = [[NSArray alloc] initWithObjects:@"นิตยสาร: สยิวสิวหาย",@"นิตยสาร: นางนวลดวลดุ้น",@"นิตยสาร: อกตุ้มหัวดำ",nil];
    coverMagzine = [[NSArray alloc] initWithObjects:@"cover1.png",@"cover2.png",@"cover3.png",nil];
    priceMagazine = [[NSArray alloc] initWithObjects:@"99",@"120",@"85",nil];
    detailMagazine = [[NSArray alloc] initWithObjects:
	@"ซื้อหนังสือเล่มนี้รับรองเสียวสะท้านทรวงกับนางแบบเต้มอ่าง ล้นๆเต็มมือ",
	@"รวมดุ้น นางแบบมีดุ้น อะไรๆก็มีดุ้นไปหมด ดวลดุ้นกันมันส์",
	@"สติกเกอร์แปะหัวนมพลังสูงรสสตอร์เบอร์รี่ กินดีโตเร็วแปปเดียวก็เข้าคุก",nil];
    [super viewDidLoad];

}
เมื่อเสร็จขั้นตอนการเปลี่ยนคำสั่ง และหายงงจากการเปลี่ยนชุด Array แล้ว ให้แก้ไข คำสั่ง
-(NSInteger)tableView:(UITableView *)tableView numberOfRowsInSection:(NSInteger)section
{
    return [tableData count];
}
ให้กลายเป็น
- (NSInteger)tableView:(UITableView *)tableView numberOfRowsInSection:(NSInteger)section
{
    return [titleMagazine count];
}
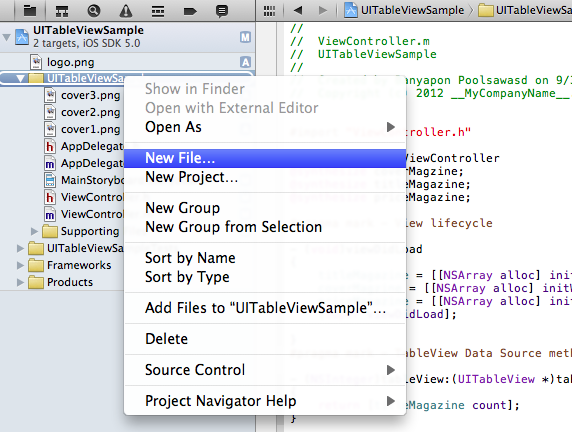
ทำการ New File ขึ้นมาใหม่ใน Project ของเรา เลือกเป็น Objective-C Class ตั้งชื่อไฟล์ว่า “SimpleTableCell”
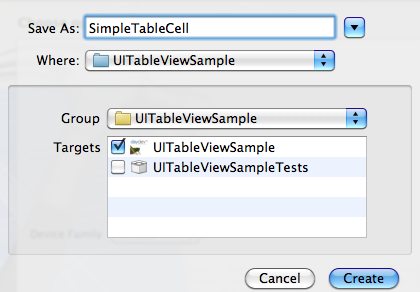
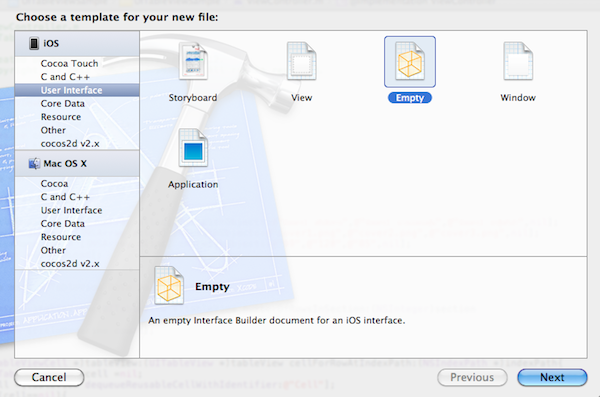
ให้สร้างไฟล์ สำหรับออกแบบ UITableViewCell ขึ้นมาใหม่ เลือกเป็น User Interface และคลิกที่รูปแบบ Empty
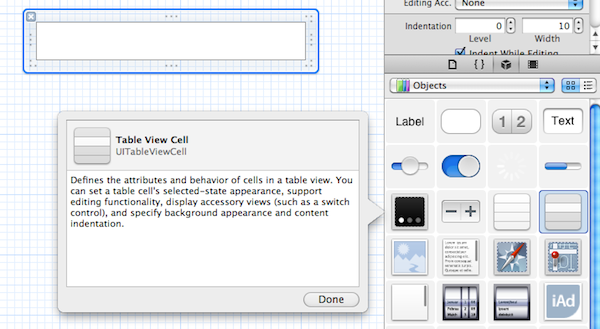
เข้าไปที่ StoryBoard ของ SimpleTableCell ให้ปรากฏหน้าจอการออกแบบ User Interface ลาก UITable View Cell ไปวางบน SimpleTableCell บน StoryBoard ต่อจากนั้นทำการวาง รูปภาพ UIImage, UILabel, UITextView ลงไปครับ ปรับแต่งให้เหมาะสม จะทำเหมือนตัวอย่างของผมก็ได้ผมจะทำรูปแบบของแอพพลิเคชัน ขายหนังสือ
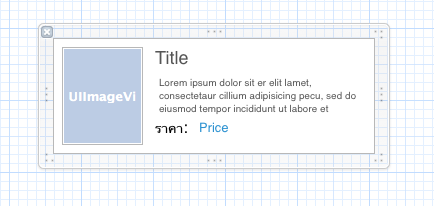
ไปที่ไฟล์ SimpleTableCell.h เพิ่ม Code ลงไป
#import

@interface SimpleTableCell : UITableViewCell
@property (nonatomic, weak) IBOutlet UILabel *TitleCell;
@property (nonatomic, weak) IBOutlet UILabel *PriceCell;
@property (nonatomic, weak) IBOutlet UIImageView *CoverCell;
@property (nonatomic, weak) IBOutlet UITextView *DetailCell;

@end
ต่อจากนั้นให้ไปเพิ่มคำสั่งลงในไฟล์ SimpleTableCell.m ดังนี้
#import "SimpleTableCell.h"

@implementation SimpleTableCell
@synthesize TitleCell = _TitleCell;
@synthesize CoverCell = _CoverCell;
@synthesize PriceCell = _PriceCell;
@synthesize DetailCell = _DetailCell;
เมื่อสร้างตัวแปล และทำการ Synthesize หมดแล้วให้ไปที่ SimpleTableCell คลิกที่ตัว UITableViewCell ใน StoryBoard เปลี่ยน Class ให้เป็น SimpleTableCell ทันที

ทำการเชื่อม UI เข้ากับตัวแปลที่สร้างขึ้นใน SimpleTableCell กับหน้าจอบน Story Board ให้ครบทุกตัว เข้ากับตัวแปล ที่เราสร้างขึ้น
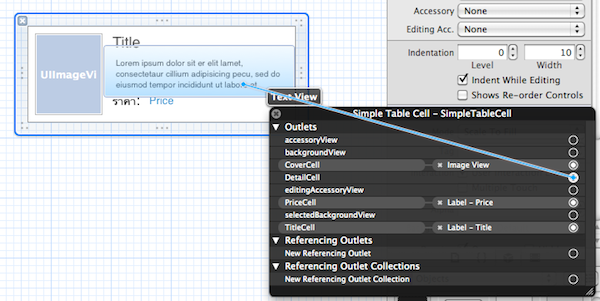
ทำการเชื่อม UIImageView กับตัวแปล CoverCell, เชื่อม UILabel ที่ตั้งชื่อว่า “Price” ไปเชื่อมกับตัวแปล PriceCell และตัวสุดท้าย UILabel ที่ตั้งชื่อว่า Title ไปเชื่อมกับตัวแปล TitleCell ครับ
แก้ไขไฟล์ ViewController.m ในฟังก์ชัน – (UITableViewCell *)tableView:(UITableView *)tableView cellForRowAtIndexPath:(NSIndexPath *)indexPath จากเดิมคือ
-(UITableViewCell *)tableView:(UITableView *)tableView cellForRowAtIndexPath:(NSIndexPath *)indexPath
{
    static NSString *simpleTableIdentifier =@"Item";
    UITableViewCell *cell=
    [tableView dequeueReusableCellWithIdentifier:simpleTableIdentifier];
    if(cell == nil){
        cell =[[UITableViewCell alloc] initWithStyle:UITableViewCellStyleDefault
        reuseIdentifier:simpleTableIdentifier];
    }
    cell.textLabel.text = [tableData objectAtIndex:indexPath.row];
    return cell;
}
ให้แก้ไขเป็น
- (UITableViewCell *)tableView:(UITableView *)tableView cellForRowAtIndexPath:(NSIndexPath *)indexPath{
    static NSString *simpleTableIdentifier = @"SimpleTableCell";
    SimpleTableCell *cell = (SimpleTableCell *)[tableView dequeueReusableCellWithIdentifier:simpleTableIdentifier];
    if(cell==nil){
        NSArray *nib = [[NSBundle mainBundle] loadNibNamed:@"SimpleTableCell"
        owner:self options:nil];
        cell = [nib objectAtIndex:0];
    }
    cell.TitleCell.text = [titleMagazine objectAtIndex:indexPath.row];
    cell.CoverCell.image = [UIImage imageNamed:[coverMagzine
    objectAtIndex:indexPath.row]];
    cell.PriceCell.text = [priceMagazine objectAtIndex:indexPath.row];
    cell.DetailCell.text= [detailMagazine objectAtIndex:indexPath.row];
    return cell;
}
ถ้าเกิด Error ไม่ต้องตกใจครับ ให้เลื่อนไปเพิ่มที่ส่วน Header ว่า
#import "ViewController.h"
#import "SimpleTableCell.h"
สุดท้ายให้เพิ่มฟังก์ชันเข้าไปเพื่อกำหนดความสูงของ Cell บน UITableViewCell โดยใช้คำสั่ง
- (CGFloat)tableView:(UITableView *)tableView heightForRowAtIndexPath:(NSIndexPath *)indexPath
{
    return 114;
}
ทำการ “Run” ตัวแอพพลิเคชันของเราดูอีกครั้ง
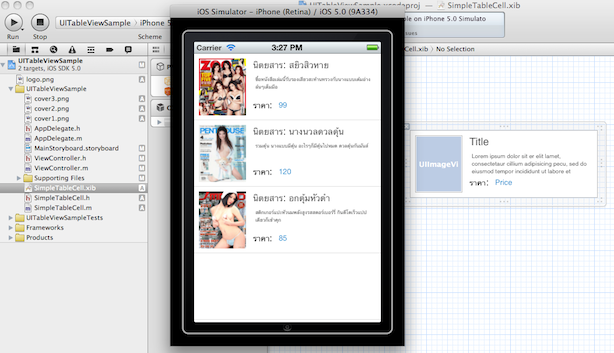
เป็นยังไงบ้างครับ วิธีการออกแบบหน้าจอแอพพลิเคชันบน iOS ในการใช้ UITableView มาปรับแต่ง UITableViewCell ให้แสดงผลได้แตกต่างกว่ารูปแบบเดิมๆ ที่มีอยู่ครับ
สำหรับ Source Code สามารถดาวน์โหลดได้ที่: http://code.google.com/p/daydev/


ขอบคุณมากๆเลยครับ
เหลือบทความอีกเยอะเลยครับ แต่ติดงานเพียบ จะทยอยอัพครับ